Automating the build pipeline to the cloud, the simple way
In this brief tutorial I’ll show you how to set up a Spring Boot project for deploying it into the cloud.
There are various tutorials for each single step here but I found none for the full process.
I’ll cover the basic set up, the configuration for testing, the build and deployment pipeline.
What you will need:
- git installed
- Atlassian Bitbucket account (it’s free you can create one here)
- Heroku account (also free, here)
- An IDE is nice to have (VS Code, IntelliJ, eclipse, whatever you prefer)
Set up the project using spring-initializr
Go to https://start.spring.io/ and generate your project with the following dependencies
- Cloud Connectors
- Spring Web Starter
Choose Java 11 in the Options
Download the resulting zip file and unpack it on your local drive.
Additional set up
We need some more dependencies and configuration than the spring initializr will include, so please copy the pom.xml from here:
<?xml version="1.0" encoding="UTF-8"?>
<project xmlns="http://maven.apache.org/POM/4.0.0"
  xmlns:xsi="http://www.w3.org/2001/XMLSchema-instance"
  xsi:schemaLocation="http://maven.apache.org/POM/4.0.0 https://maven.apache.org/xsd/maven-4.0.0.xsd">
  <modelVersion>4.0.0</modelVersion>
  <parent>
    <groupId>org.springframework.boot</groupId>
    <artifactId>spring-boot-starter-parent</artifactId>
    <version>2.1.7.RELEASE</version>
    <relativePath/> <!-- lookup parent from repository -->
  </parent>
  <groupId>io.gaddings</groupId>
  <artifactId>cloud-deployment</artifactId>
  <version>0.0.1-SNAPSHOT</version>
  <name>cloud-deployment</name>
  <description>Demo project for Spring Boot</description>

  <properties>
    <java.version>11</java.version>
  </properties>

  <dependencies>
    <dependency>
      <groupId>org.springframework.boot</groupId>
      <artifactId>spring-boot-starter-cloud-connectors</artifactId>
    </dependency>
    <dependency>
      <groupId>org.springframework.boot</groupId>
      <artifactId>spring-boot-starter-web</artifactId>
    </dependency>

    <dependency>
      <groupId>org.springframework.boot</groupId>
      <artifactId>spring-boot-starter-test</artifactId>
      <scope>test</scope>
    </dependency>
    <dependency>
      <groupId>io.rest-assured</groupId>
      <artifactId>rest-assured</artifactId>
      <scope>test</scope>
    </dependency>
  </dependencies>

  <build>
    <plugins>
      <plugin>
        <groupId>org.springframework.boot</groupId>
        <artifactId>spring-boot-maven-plugin</artifactId>
      </plugin>
      <plugin>
        <artifactId>maven-failsafe-plugin</artifactId>
        <version>2.22.0</version>
        <configuration>
          <includes>
            <include>**/*IT</include>
          </includes>
        </configuration>
      </plugin>
    </plugins>
  </build>

</project>
Adding the “maven-failsafe-plugin” to the configuration here will allow us to execute unit tests and integration tests in separate steps of the maven lifecycle (test and verify).
Note: We will use Java 11 for this tutorial. Since the default version used by Heroku still is 8 we need to specify this.
To do that create a file named “system.properties” in your project root directory with the following content:
java.runtime.version=11
Do some hello world stuff
Note: This is not a Spring Boot tutorial. It’s all about the build and deployment pipeline. The code here has little practical use.
Create a class HelloWorldController.java (in a subpackage):
package io.gaddings.clouddeployment.controller;

import org.springframework.web.bind.annotation.GetMapping;
import org.springframework.web.bind.annotation.RestController;

@RestController
public class HelloWorldController {

  @GetMapping("/hello")
  public String helloWorld() {
    return "Hello, World!";
  }

}
Then create a unit test for it (in the test packages of course):
package io.gaddings.clouddeployment.controller;

import static org.assertj.core.api.Assertions.assertThat;

import org.junit.Before;
import org.junit.Test;

public class HelloWorldControllerTest {

  private HelloWorldController subject;

  @Before
  public void setUp() {
    this.subject = new HelloWorldController();
  }

  @Test
  public void testHello() {
    assertThat(this.subject.helloWorld()).isEqualTo("Hello, World!");
  }

}
And then, an integration test:
package io.gaddings.clouddeployment.controller;

import static io.restassured.RestAssured.get;
import static org.assertj.core.api.AssertionsForClassTypes.assertThat;

import io.gaddings.clouddeployment.CloudDeploymentApplication;
import org.junit.Before;
import org.junit.Test;
import org.junit.runner.RunWith;
import org.springframework.boot.test.context.SpringBootTest;
import org.springframework.boot.web.server.LocalServerPort;
import org.springframework.http.HttpStatus;
import org.springframework.test.context.junit4.SpringRunner;

@RunWith(SpringRunner.class)
@SpringBootTest(classes = {CloudDeploymentApplication.class},
    webEnvironment = SpringBootTest.WebEnvironment.RANDOM_PORT)
public class HelloWorldControllerIT {

  @LocalServerPort
  private int port;

  private String apiEndpoint;

  @Before
  public void setUp() {
    this.apiEndpoint = "http://localhost:" + port + "/hello";
  }

  @Test
  public void testHello() {
    assertThat(get(apiEndpoint).getStatusCode()).isEqualTo(HttpStatus.OK.value());
  }

}
Commit it to Bitbucket
Log into your Bitbucket account and create a project (git, java) there.
Copy the git URL. Open your terminal and follow the instructions.
git init
git add --all
git commit -m "Initial commit"
git remote add origin <your URL here>
git push origin master
After you have pushed your stuff you should see it in the bitbucket UI.
Create a build pipeline script
You can actually do this via Bitbucket itself. Just click on the “pipelines” section and choose the Java template.
Create a pipeline script like this (bitbucket-pipelines.yml):
image: maven:3.6.1

pipelines:
  default:
    - step:
        name: Build and test
        caches:
          - maven
        script:
          - mvn clean verify
This will build and test your project automatically on every push.
Depending on your settings in Bitbucket you’ll receive an e-mail notification when you break the build.
Commit your script and watch your pipeline getting executed, if you want.
Throw your app into the cloud
Log into your Heroku account and create a project there.
In Heroku you can deploy your app using git. You just need to push it there and it will build it and run it. It’s made for cloud-native apps, like the one we build here.

Instead of doing deployment manually (Heroku itself has great documentation and tools for that, if you want to know), we prefer to have it deployed whenever the master branch is built successfully.
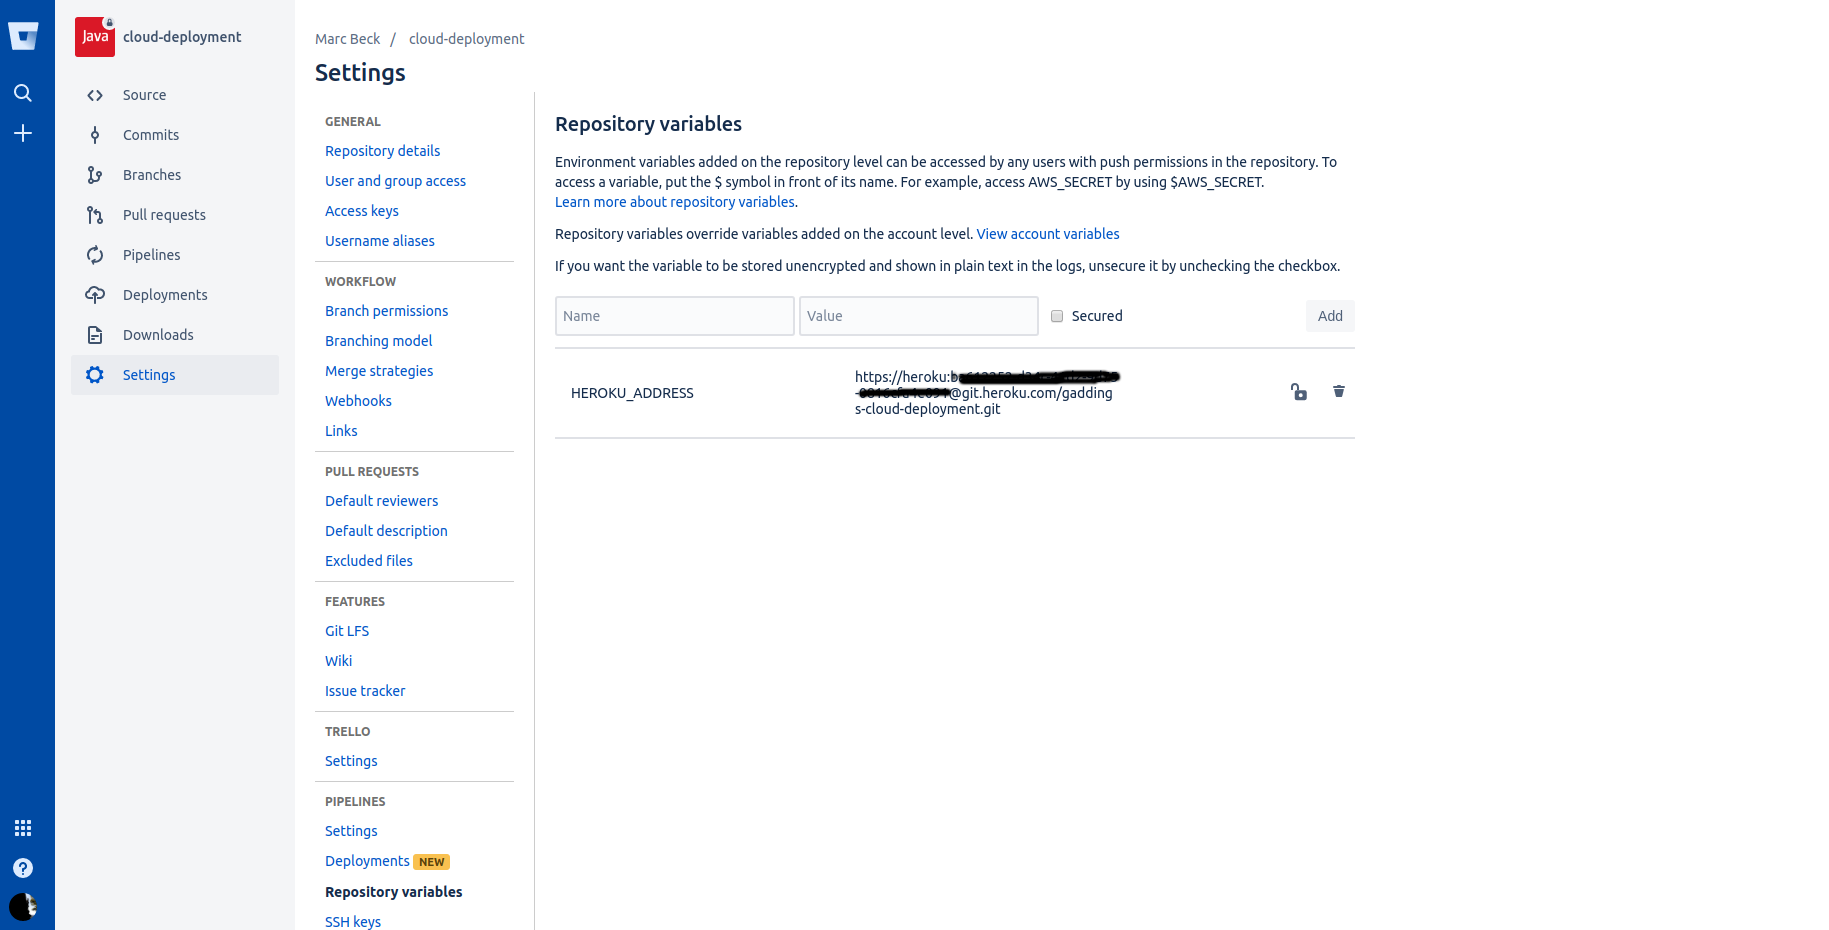
For achieving this you need to find your API key in the Heroku settings (it looks like a UUID). And combine it with you repository URL like this:
https://heroku:<API-KEY>@git.heroku.com/gaddings-cloud-deployment.git
(where gaddings-cloud-deployment is your projects/repositories name of course)
This URL can now be entered in bitbucket in the “Settings” – “Repository variables” section.
Choose HEROKU_ADDRESS as the name and the URL as the value.
Then extend your pipeline script to match the following:
image: maven:3.6.1

pipelines:
  default:
    - step:
        name: Build and test
        caches:
          - maven
        script:
          - mvn clean verify
  branches:
    master:
      - step:
          name: Build and test
          caches:
            - maven
          script:
            - mvn clean install
      - step:
          name: Release to heroku
          script:
            - git push $HEROKU_ADDRESS HEAD:master
This will result in two steps for the master branch:
The first also builds and tests. The second is executed when the first step was successful and will push it to heroku.
Commit it and watch the “terminal” again.
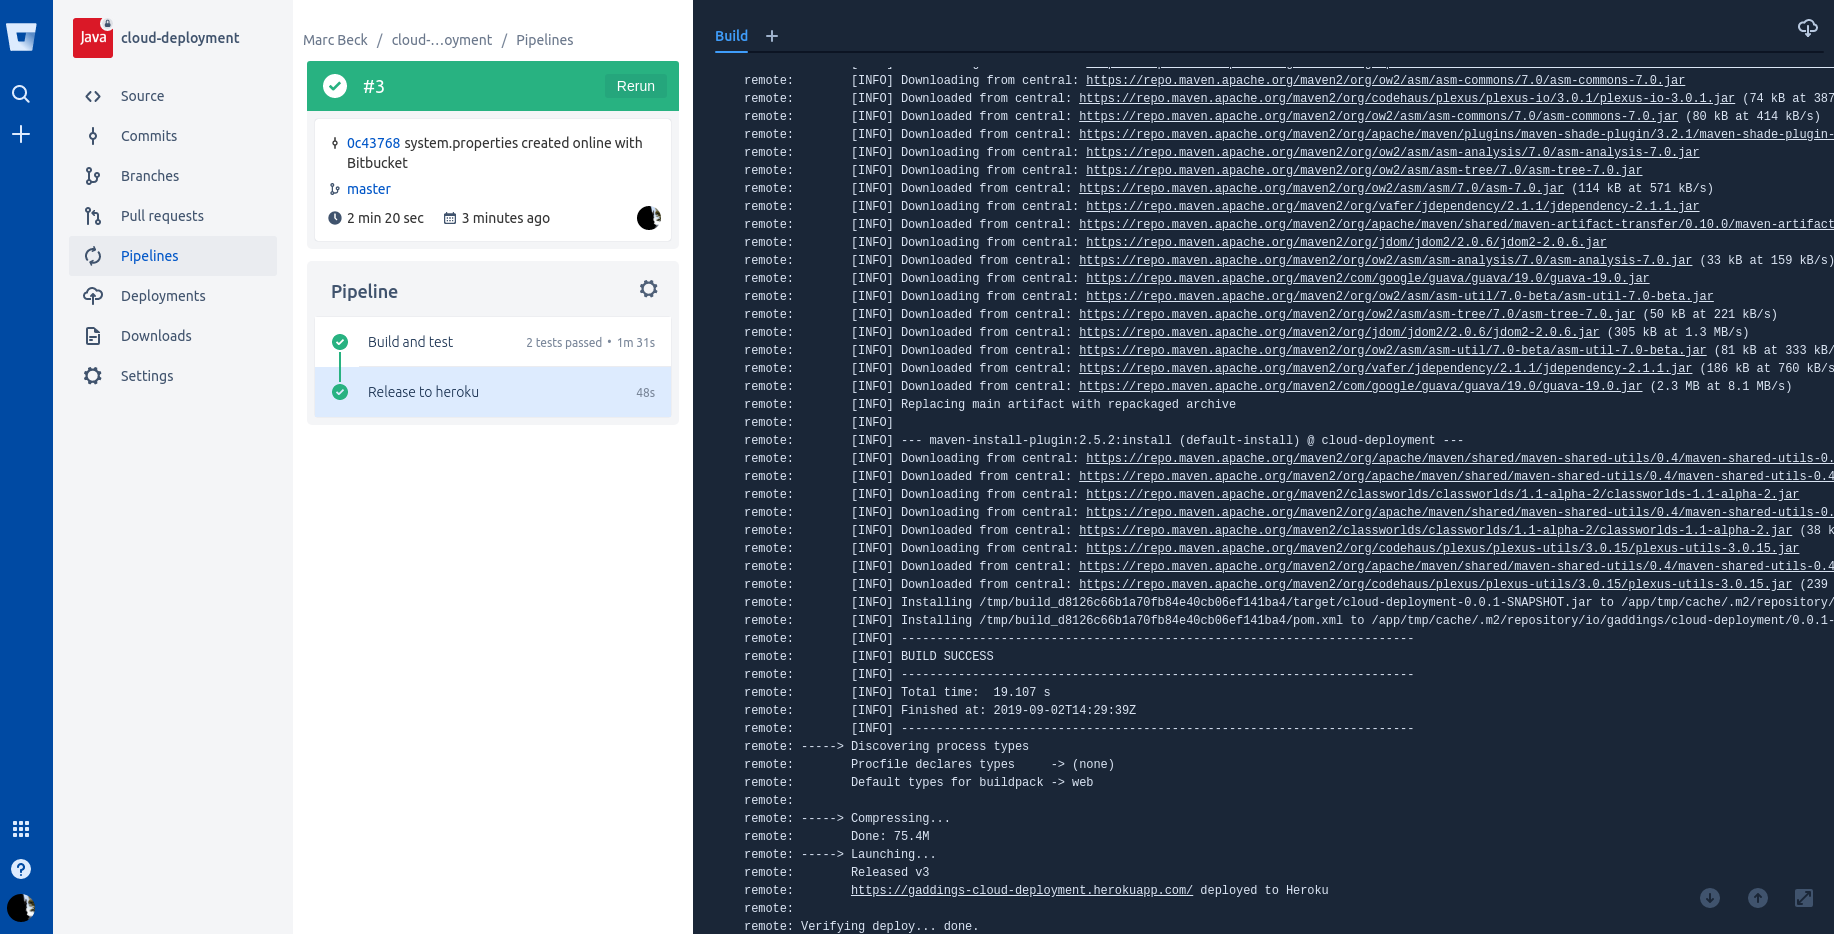
And that’s it. As soon as the build on the heroku side is done, your app is up and running.
Go to https://<your-app-name>.herokuapp.com/hello and enjoy!
Final words
Congratulations! You just deployed your first microservice to the cloud!
Is it as simple as that in your companies environment? It should be. Or even easier, considering that you can create templates for almost everything.
If it’s not you can probably change this now!