Hi folks, I have decided to revive this blog and return the focus to more technical articles once again.
I will not make simple how-to articles for specific technologies though.
There are blogs like Baeldung and many others which offer high quality content on these topics.
I want to do more realistic stuff. Not focussing on technologies but professional software development in a holistic manner.
This is the first article of this kind: About building a backoffice service.
Implementing the typical backoffice service
The stereotypical backoffice service is one where data in a specific format (like JSON or XML) comes in from a source, is processed (transformed, enriched, etc.) and put out to a target sink.
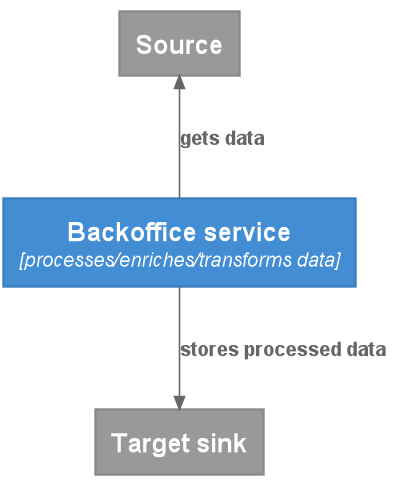
It usually has no API exposed to the outside world and no needs for user authentication and the like.
Typical sources can be queues or messaging systems. For example RabbitMQ, Beanstalkd, Apache Kafka or SQS. Or a HTTP-endpoint, a database, a file system that is crawled or whatever you can imagine.
Typical target sinks could also be messaging systems, but also storage services (like S3), databases or a search index.
Of course not all services are like this, but for backoffice development these kind of services make up a big share of the whole bunch.
Unless you are at one of these companies that make heavy use of ETL tools.
So let’s get started with a simple, yet full-blown, example!
Random scenario
For this article it doesn’t really matter which source system we use so I just decide to use Amazon SQS here.
Same for the target sink: Let us use an Amazon S3 bucket.
The data incoming could be for exampe a “CustomerCreatedEvent” in JSON format. The task then is to transform these events into entities and persist to our target sink.
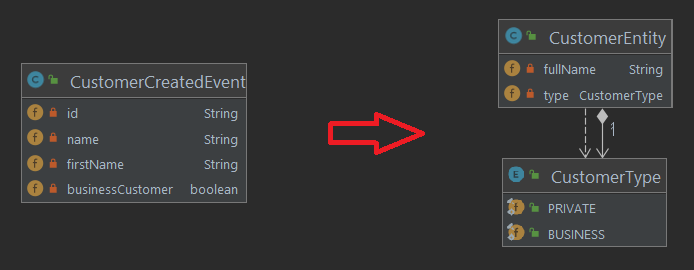
So a CustomerCreatedEvent contains some kind of ID, which will be used as the S3 entry key later. The other properties “name” and “firstName” will be joined to “fullName” and the boolean “businessCustomer” flag is mapped to a value from the CustomerType enum.
So basically we want to go from this:
{
  "id": "efb40e2a-edab-4770-9614-cf85438f98a8",
  "name": "Bacon",
  "firstName": "Chris P.",
  "businessCustomer": false
}
to this:
{
  "fullName": "Chris P. Bacon",
  "type": "PRIVATE"
}
Let us now move on to the practical work!
Set up the project
First we head to https://start.spring.io and set up our project. We add dependencies we always need like actuator, lombok, testcontainers and the like.
Disclaimer: Of course in professional life we have templates and existing stuff where we can copy & paste from, but for this article I will just pretend we don’t have it.
After that we add the other maven dependencies we need manually to the pom. In this case it is the S3 client and some test dependencies and plugins. I won’t list everything here to not bore you with this stuff. You can have a look at the repo if you want to.
You can find everything from this article in my newly created github repo: https://github.com/gaddingsio/backoffice-service
(for my previous stuff I have used non-public Bitbucket repos)
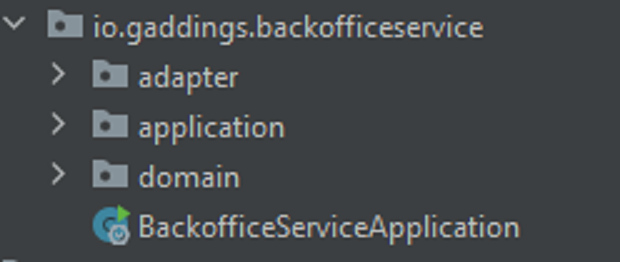
Create the package structure
Once the fresh new service is set up we proceed with creating the package structure. Here we go for the hexagonal architecture. This is an architectural pattern that enables maintainable and evolutionary systems. To go into details is out of the scope of this article. It’s all about (loose) coupling and separation of concerns.
Here we create three packages:
- adapter: This will contain the external interfaces of the application (the connection to the source and target sink)
- domain: This will contain the domain objects and their behavior (our domain objects and the mapping logic)
- application: This will contain the application logic (the bridge between adapters and domain)
Implement domain logic
Once the package structure is done we create the basic domain classes for customers.
So we have the CustomerCreatedEvent which is the incoming data:
@Data
@Builder
@NoArgsConstructor
@AllArgsConstructor
public class CustomerCreatedEvent {

    private String id;
    private String name;
    private String firstName;
    private boolean businessCustomer;

}
And the CustomerEntity which is the data we want to persist:
@Data
@NoArgsConstructor
@AllArgsConstructor
public class CustomerEntity {

    private String fullName;
    private CustomerType type;

}
along with this Enum for the CustomerType:
public enum CustomerType {
    PRIVATE,
    BUSINESS
}
Now we can implement the domain logic. Which is converting from the event to the entity.
For simplicity reasons we just add an empty “fromEvent” function into our class:
@Data
@NoArgsConstructor
@AllArgsConstructor
public class CustomerEntity {

    private String fullName;
    private CustomerType type;

    public static CustomerEntity fromEvent(final CustomerCreatedEvent event) {
      return null; // we will implement that...
    }
}
And then… a test! Yes, really before any other code exists!
We know what our core logic should do, so we create the contract first: We define what we expect it to do and create a unit test with several variations first.
class CustomerEntityTest {

    @ParameterizedTest
    @MethodSource("provideVariations")
    void creatingFromEvent(final CustomerCreatedEvent input, final CustomerEntity expected) {
        assertThat(CustomerEntity.fromEvent(input)).isEqualTo(expected);
    }

    private static Stream<Arguments> provideVariations() {
        return Stream.of(
            Arguments.of(
                CustomerCreatedEvent.builder().name("Bacon").firstName("Chris P.").businessCustomer(false).build(),
                new CustomerEntity("Chris P. Bacon", CustomerType.PRIVATE)),
            Arguments.of(
                CustomerCreatedEvent.builder().name("Bacon").businessCustomer(false).build(),
                new CustomerEntity("Bacon", CustomerType.PRIVATE)),
            Arguments.of(
                CustomerCreatedEvent.builder().businessCustomer(false).build(),
                new CustomerEntity("", CustomerType.PRIVATE)),
            Arguments.of(
                CustomerCreatedEvent.builder().build(),
                new CustomerEntity("", CustomerType.PRIVATE)),
            Arguments.of(
                CustomerCreatedEvent.builder().firstName("Chris P.").businessCustomer(false).build(),
                new CustomerEntity("Chris P.", CustomerType.PRIVATE)),
            Arguments.of(
                CustomerCreatedEvent.builder().name("Bacon").firstName("Chris P.").businessCustomer(true).build(),
                new CustomerEntity("Chris P. Bacon", CustomerType.BUSINESS))
        );
    }
}
After the test is done we write code until it is green. Luckily it’s pretty easy here:
@Data
@NoArgsConstructor
@AllArgsConstructor
public class CustomerEntity {

    private String fullName;
    private CustomerType type;

    public static CustomerEntity fromEvent(final CustomerCreatedEvent event) {
        val fullName = (Objects.toString(event.getFirstName(), "") + " " + Objects.toString(event.getName(), "")).trim();
        val type = event.isBusinessCustomer() ? CustomerType.BUSINESS : CustomerType.PRIVATE;
        return new CustomerEntity(fullName, type);
    }
}
Implementing the application layer
The application layer is what connects the domain layer with the adapter layer.
Hence we need a class that receives the data from the adapter layer, triggers the domain logic to do what it has to do and then push it to the adapter layer again.
So we create two things here: A CustomerPersister that receives the data from the adapter layer, triggers the domain logic to do what it has to do and then push it to the adapter layer again.
And a PersistencePort. This is an interface that is used for decoupling the application layer from the adapter layer.
@Service
public class CustomerPersister {

    private final PersistencePort persistencePort;

    public CustomerPersister(final PersistencePort persistencePort) {
        this.persistencePort = persistencePort;
    }

    public void createPersistentCustomer(final CustomerCreatedEvent customerCreatedEvent) {
        // We implement this...
    }
}
package io.gaddings.backofficeservice.application.ports;

public interface PersistencePort {

    void save(String key, CustomerEntity customerEntity);
}
(Note that the PersistencePort resides in a subpackage “ports“)
Here we go with a test-first approach again and define the desired behavior:
@ExtendWith(MockitoExtension.class)
class CustomerPersisterTest {

    @Mock
    private PersistencePort persistencePort;
    @InjectMocks
    private CustomerPersister underTest;

    @Nested
    class WhenCreatingPersistentCustomer {

        @Test
        void test() {
            val customerCreatedEvent = CustomerCreatedEvent.builder().id("id").build();

            assertThatCode(() -> underTest.createPersistentCustomer(customerCreatedEvent)).doesNotThrowAnyException();

            verify(persistencePort).save(eq("id.json"), any(CustomerEntity.class));
        }
    }
}
Here we just check the flow:
We get a CustomerCreatedEvent and the “save” method of the PersistencePort (which we replaced with a test double) is being called with a CustomerEntity.
We don’t need to check the conversion here again, because we already had that tested in the domain logic.
So the implementation of the CustomerPersister is easy:
@Slf4j
@Service
public class CustomerPersister {

    private final PersistencePort persistencePort;

    public CustomerPersister(final PersistencePort persistencePort) {
        this.persistencePort = persistencePort;
    }

    public void createPersistentCustomer(final CustomerCreatedEvent customerCreatedEvent) {
        val key = customerCreatedEvent.getId();
        log.info("Persisting customer with id={}", key);
        val customerEntity = CustomerEntity.fromEvent(customerCreatedEvent);
        persistencePort.save(key + ".json", customerEntity);
    }
}
Implementing the adapter layer
As much as I like the test-first approach, for external system stuff it is just not that useful. Since it is more configuration than writing code.
Unit tests here have little value, since we’d need to mock a lot of things and it wouldn’t prove any functionality in production use.
The approach on how to implement the components in this layer differs a bit depending on whether you have done this before or not:
- If you never worked with the tech at hand before you usually start with writing a docker-compose file or cloud setup for having a running dev environment.
With this in place you can then proceed to have some exploratory (unit) testing to figure out how it works. - If you know your stuff already you usually go the “copy, paste and modify” route.
At least if you are a lazy guy like me.
Source adapter: SQS
So let’s just write adapters for the source adapter. A SQS message listener and the configuration needed for that:
@Slf4j
@Component
public class MessageListener {

    private final CustomerPersister customerPersister;

    public MessageListener(final CustomerPersister customerPersister) {
        this.customerPersister = customerPersister;
    }

    @SqsListener("${sqs.queue}")
    public void processMessage(@Payload final CustomerCreatedEvent customerCreatedEvent) {
        log.info("Received CustomerCreatedEvent: {}", customerCreatedEvent.getId());
        customerPersister.createPersistentCustomer(customerCreatedEvent);
    }
}
@Configuration
public class MessagingConfiguration {

    @Bean
    public MappingJackson2MessageConverter mappingJackson2MessageConverter(final ObjectMapper objectMapper) {
        val jackson2MessageConverter = new MappingJackson2MessageConverter();
        jackson2MessageConverter.setObjectMapper(objectMapper);
        return jackson2MessageConverter;
    }

    @Bean
    public QueueMessagingTemplate queueMessagingTemplate(final AmazonSQSAsync amazonSQS) {
        return new QueueMessagingTemplate(amazonSQS);
    }
}
This will read messages from our SQS queue, map them into our domain class and then provide it to the application layer.
Target sink adapter: S3
And now the adapter for the target sink: S3
@Component
public class S3Facade implements PersistencePort {

    private final AmazonS3 amazonS3;
    private final String bucket;
    private final ObjectMapper objectMapper;

    public S3Facade(final AmazonS3 amazonS3, @Value("${s3.bucket}") String bucket, final ObjectMapper objectMapper) {
        this.amazonS3 = amazonS3;
        this.bucket = bucket;
        this.objectMapper = objectMapper;
    }

    @SneakyThrows
    @Override
    public void save(final String key, final CustomerEntity customerEntity) {
        amazonS3.putObject(bucket, key, objectMapper.writeValueAsString(customerEntity));
    }
}
This just receives the CustomerEntity from the application layer and puts it as an object into an S3 bucket.
Note: This one implements the PersistencePort interface from the application.ports package. This way the inner layers of the application can stay agnostic to the rest of the world. Only the adapter layer knows details about external systems.
The core domain and application code neither knows anything about where the data comes from (SQS) nor where its processing results end up (S3)!
Once the adapters are implemented we ought to test the whole thing in action!
Integration Test
It can make sense to have separate tests for both adapters in many scenarios.
However for these little backoffice services a complete integration test of all components is often the way to go for me.
It’s easy to set up with testcontainers:
@Testcontainers
@SpringBootTest(classes = BackofficeServiceApplication.class)
class BackofficeServiceIT {

    @Container
    public final static LocalStackContainer LOCAL_STACK_CONTAINER = new LocalStackContainer(DockerImageName.parse("localstack/localstack:0.11.2"))
        .withServices(S3, SQS);

    private static final String QUEUE_NAME = "customer-test-queue";
    private static final String BUCKET_NAME = "customer-test-bucket";

    @Autowired
    private AmazonS3 amazonS3;

    @Autowired
    private QueueMessagingTemplate queueMessagingTemplate;

    @SneakyThrows
    @BeforeAll
    static void setUp() {
        LOCAL_STACK_CONTAINER.execInContainer("awslocal", "sqs", "create-queue", "--queue-name", QUEUE_NAME);
        LOCAL_STACK_CONTAINER.execInContainer("awslocal", "s3", "mb", "s3://" + BUCKET_NAME);
    }

    @Test
    void integrationTest() {
        queueMessagingTemplate.send(QUEUE_NAME, new GenericMessage<>("""
            {
              "id": "efb40e2a-edab-4770-9614-cf85438f98a8",
              "name": "Bacon",
              "firstName": "Chris P.",
              "businessCustomer": false
            }
            """, Map.of("contentType", "application/json")));

        await().atMost(30, TimeUnit.SECONDS).until(
            () -> amazonS3.doesObjectExist(BUCKET_NAME, "efb40e2a-edab-4770-9614-cf85438f98a8.json")
        );
    }

    @DynamicPropertySource
    static void overrideConfiguration(DynamicPropertyRegistry registry) {
        registry.add("cloud.aws.sqs.endpoint", () -> LOCAL_STACK_CONTAINER.getEndpointOverride(SQS));
        registry.add("cloud.aws.s3.endpoint", () -> LOCAL_STACK_CONTAINER.getEndpointOverride(S3));
        registry.add("cloud.aws.credentials.access-key", LOCAL_STACK_CONTAINER::getAccessKey);
        registry.add("cloud.aws.credentials.secret-key", LOCAL_STACK_CONTAINER::getSecretKey);
        registry.add("sqs.queue", () -> QUEUE_NAME);
        registry.add("s3.bucket", () -> BUCKET_NAME);
    }
}
This test actually sets up the whole infrastructure for us via testcontainers, creates the SQS queue and the S3 bucket.
Then, in the integrationTest method, it pushes a JSON message into the queue and verifies that something is put into our bucket.
(Here you can see why I picked the combo SQS and S3, instead of let’s say Kafka and MongoDB: I only need one container to test it all.
Not that it’s not easy to set up with the Kafka and MongoDB combo too, but I’m lazy: If I can save myself some lines here that’s great 🙂 )
So that’s it. We implemented everything the service needs to do! This already is a fully functioning service!
Ensure Maintainability
A task that is left is to help maintainability: We need documentation!
In a professional environment we work on many things. We will soon have either forgotten what this service does in detail or another developer will work on it. So it’s nice to have a little documentation about it:
Create a diagram with PlantUML:
@startuml
!include https://raw.githubusercontent.com/plantuml-stdlib/C4-PlantUML/master/C4_Container.puml
!include https://raw.githubusercontent.com/plantuml-stdlib/C4-PlantUML/master/C4_Context.puml
!define FONTAWESOME https://raw.githubusercontent.com/tupadr3/plantuml-icon-font-sprites/master/font-awesome-5
!include FONTAWESOME/cube.puml
!include FONTAWESOME/amazon.puml

title: backoffice-service

  Boundary(sqs, "SQS") {
      System_Ext(customerQueue, "customer-queue")
  }
  Container(backofficeService, "Backoffice service", "java service", "Extracts customers and saves them to S3", $sprite="cube")
  System_Ext(s3, "S3", "Bucket: customers", "", $sprite="amazon")

  Rel_U(backofficeService, customerQueue, "consumes CustomerCreated events")
  Rel_D(backofficeService, s3, "writes customer data")

  SHOW_DYNAMIC_LEGEND()
@enduml
Export it as an image (Plugins are available for most IDEs):
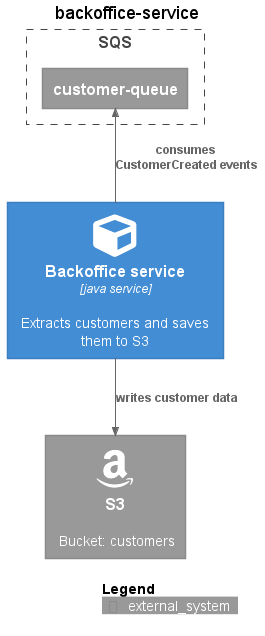
And put it into a README.md.
In addition we put some lines about the services purpose in there.
Another thing we could do is to make sure when the code is refactored that our package structure (the hexagonal architecture) will not be broken.
We could write that down in the README too. But seriously: We developers don’t read that.
But thankfully there’s ArchUnit .
We add this test:
@AnalyzeClasses(packages = "io.gaddings.backofficeservice", importOptions = {ImportOption.DoNotIncludeTests.class})
public class ArchitectureTest {

    @ArchTest
    void hexagonalArchitecture(JavaClasses classes) {
        layeredArchitecture()
            .layer("adapter").definedBy("..adapter..")
            .layer("application").definedBy("..application..")
            .layer("domain").definedBy("..domain..")
            .whereLayer("adapter").mayNotBeAccessedByAnyLayer()
            .whereLayer("application").mayOnlyBeAccessedByLayers("adapter")
            .whereLayer("domain").mayOnlyBeAccessedByLayers("adapter", "application")
            .check(classes);
    }

    @ArchTest
    static final ArchRule FREE_OF_CYCLES = slices().matching("io.gaddings.backofficeservice.(*)..")
        .should().beFreeOfCycles();

    @ArchTest
    static final ArchRule ADAPTERS_DO_NOT_DEPEND_ON_ONE_ANOTHER = slices()
        .matching("..adapter.(**)")
        .should().notDependOnEachOther()
        .as("Adapters do not depend on one another")
        .because("Adapters should only depend on one external system; depending on other adapters is likely to imply pulling dependencies towards other external systems");

    @ArchTest
    static final ArchRule PORTS_SHOULD_ONLY_BE_INTERFACES = classes().that().resideInAPackage("..ports..").should().beInterfaces();
}
And we have the architecture documented with the benefit that the build will break once our rules are violated.
Next steps
In a professional environment we would now push our service to a repository and have one or more people review it.
Or we have done it in pair/mob programming and a review can be omitted.
Then it would run through a CI/CD pipeline and be deployed in the cloud or on-premise infrastructure.
But that might be a topic for another article later on.
Summary
We learned how to build a typical backoffice service up to the point where implementation is done completely and maintainability is ensured.
Not all backoffice services are like the one we have seen here, a fair share of them is though.
They might have different or more adapters to the “outside worlds”. Like having to call an API to enrich the data or merging data from different sources, but the general procedure and structure always stays the same.
That’s how I do it. What’s your approach? Can I improve on anything?
Feel free to discuss and check out the code to play around with it!
Very professional way of working/coding/organizing! I have learned lot of new cool things and I liked the approach of the “Contract” testing and the ArchUnit thing, and the super clear explanation of the hexagonal architecture. very fruitful article..
Thank you and keep it up! 🙂
nice job marc 😉 – thanks a lot
I enjoyed your article, as always. Thanks for sharing!