In this article I want to show you how to test a spring-boot application that sends and consumes messages from RabbitMQ queues.
Update 2022-10-18: You can find an updated version of the code in this article on github: https://github.com/gaddingsio/rabbitmqtestcontainers
RabbitMQ is an open-source message-broker software that supports the Advanced Message Queuing Protocol (AMQP) among other protocols.
Note: This article is about testing. There are great articles outside (on Baeldung for example) which cover the basics or specialties of using spring-amqp.
What you will need:
- Java 11
- Maven
- Docker
Set up
Set up a spring boot project using spring initializr:
Go to: https://start.spring.io/
Choose:
- Spring for RabbitMQ (this will add the spring-boot-starter-amqp to your pom.xml)
- Lombok (I can’t write Java without it)
(the Java version is not important here, I used 11 though)

Generate your project, download and unpack it.
Then add the following dependencies to the maven pom.xml (we’ll need them later):
<dependency>
	<groupId>org.assertj</groupId>
	<artifactId>assertj-core</artifactId>
	<scope>test</scope>
</dependency>
<dependency>
	<groupId>org.awaitility</groupId>
	<artifactId>awaitility</artifactId>
	<version>4.0.1</version>
	<scope>test</scope>
</dependency>
AssertJ for fluent assertions and Awaitility for “waiting” until a message is received in our tests.
Create a simple messaging App
Before we can start with testing we need something to test, obviously.
Create a class MessagingConfig.java (in your main package) with the following content:
package io.gaddings.messaging.demomessaging;

import lombok.val;
import org.springframework.amqp.core.BindingBuilder;
import org.springframework.amqp.core.Declarables;
import org.springframework.amqp.core.FanoutExchange;
import org.springframework.amqp.core.Queue;
import org.springframework.amqp.core.TopicExchange;
import org.springframework.context.annotation.Bean;
import org.springframework.context.annotation.Configuration;

@Configuration
public class MessagingConfig {

  public final static String FANOUT_QUEUE_NAME = "amqp.fanout.queue";
  public final static String FANOUT_EXCHANGE_NAME = "amqp.fanout.exchange";
  public final static String TOPIC_QUEUE_NAME = "amqp.topic.queue";
  public final static String TOPIC_EXCHANGE_NAME = "amqp.topic.exchange";
  public static final String BINDING_PATTERN_ERROR = "#.error";
  private static final boolean NON_DURABLE = false;
  private static final boolean DO_NOT_AUTO_DELETE = false;

  @Bean
  public Declarables topicBindings() {
    val topicQueue = new Queue(TOPIC_QUEUE_NAME, NON_DURABLE);

    val topicExchange = new TopicExchange(TOPIC_EXCHANGE_NAME, NON_DURABLE,
        DO_NOT_AUTO_DELETE);

    return new Declarables(topicQueue, topicExchange, BindingBuilder
        .bind(topicQueue)
        .to(topicExchange)
        .with(BINDING_PATTERN_ERROR));
  }

  @Bean
  public Declarables fanoutBindings() {
    val fanoutQueue = new Queue(FANOUT_QUEUE_NAME, NON_DURABLE);

    val fanoutExchange = new FanoutExchange(FANOUT_EXCHANGE_NAME, NON_DURABLE,
        DO_NOT_AUTO_DELETE);

    return new Declarables(fanoutQueue, fanoutExchange, BindingBuilder
        .bind(fanoutQueue)
        .to(fanoutExchange));
  }

}
This will be all configuration that is needed for our application:
A broadcast (fanout) exchange/queue and a topic exchange/queue which gathers every message that comes in with a routing key that ends with “.error”.
Now let’s create the message sender (publisher):
package io.gaddings.messaging.demomessaging;

import org.springframework.amqp.rabbit.core.RabbitTemplate;
import org.springframework.stereotype.Component;

@Component
public class MessageSender {

  private RabbitTemplate rabbitTemplate;

  public MessageSender(RabbitTemplate rabbitTemplate) {
    this.rabbitTemplate = rabbitTemplate;
  }

  public void broadcast(String message) {
    this.rabbitTemplate.convertAndSend(MessagingConfig.FANOUT_EXCHANGE_NAME, "", message);
  }

  public void sendError(String message) {
    this.rabbitTemplate.convertAndSend(MessagingConfig.TOPIC_EXCHANGE_NAME, "this.is.an.error", message);
  }

}
And the receiver (consumer):
package io.gaddings.messaging.demomessaging;

import static io.gaddings.messaging.demomessaging.MessagingConfig.BINDING_PATTERN_ERROR;
import static io.gaddings.messaging.demomessaging.MessagingConfig.FANOUT_QUEUE_NAME;
import static io.gaddings.messaging.demomessaging.MessagingConfig.TOPIC_QUEUE_NAME;

import org.springframework.amqp.rabbit.annotation.RabbitListener;
import org.springframework.stereotype.Component;

@Component
public class MessageReceiver {

  @RabbitListener(queues = {FANOUT_QUEUE_NAME})
  public void receiveMessageFromFanout(String message) {
    System.out.println("Received broadcast message: " + message);
  }


  @RabbitListener(queues = {TOPIC_QUEUE_NAME})
  public void receiveMessageFromTopic(String message) {
    System.out.println("Received topic (" + BINDING_PATTERN_ERROR + ") message: " + message);
  }

}
And that’s it. Your are ready to run with the rabbit.
Of course this application is a bit unconventional, usually you won’t have the publishing and the consuming part in one application. But it helps showing the whole “flow” here.
Now, let us do some manual testing by modifying the main class:
package io.gaddings.messaging.demomessaging;

import org.springframework.boot.ApplicationRunner;
import org.springframework.boot.SpringApplication;
import org.springframework.boot.autoconfigure.SpringBootApplication;
import org.springframework.context.annotation.Bean;

@SpringBootApplication
public class DemoMessagingApplication {


  public static void main(String[] args) {
    SpringApplication.run(DemoMessagingApplication.class, args);
  }

  @Bean
  public ApplicationRunner runner(MessageSender messageSender) {
    return args -> {
      messageSender.broadcast("a broadcast message");
      messageSender.sendError("an error message");
      messageSender.broadcast("another broadcast message");
      messageSender.broadcast("that's it");
    };
  }

}
But stop: Running it won’t work. We need to have a running RabbitMQ instance on our machine…
Docker to the rescue
Get your rabbit by typing this into your shell/command line:
docker run -d -p 5672:5672 -p 15672:15672 --name my-rabbit rabbitmq:3-management
This gives you a running docker container to go.
You can access the management console via:
User is “guest“, password is also “guest“.
So let us run our example application.
You will see the following output in the console:
Received topic (#.error) message: an error message
Received broadcast message: a broadcast message
Received broadcast message: another broadcast message
Received broadcast message: that's it
(the order may vary, since the error queue and the fanout queue senders and receivers work independently)
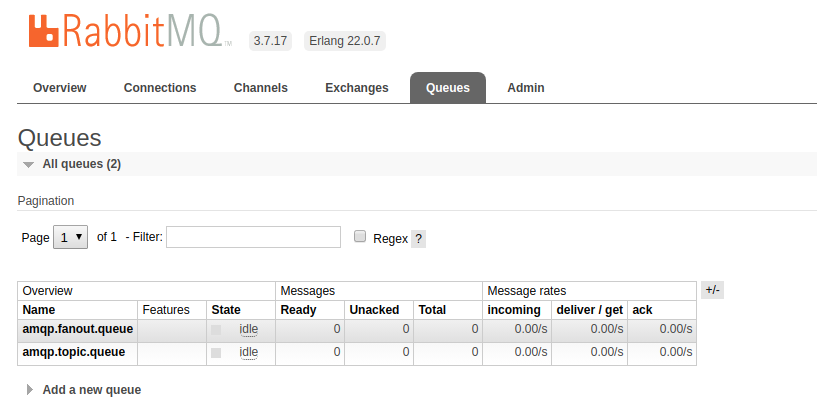
And, if you browse to the RabbitMQ console you will see that your queues are created:
Fine for now. Let’s go to the main topic of this article.
How to test components connecting to RabbitMQ
Basics: Unit tests for sender and receiver
This is a thing where a lot of people are struggling:
Unit tests for components that are responsible for sending/receiving messages to/from RabbitMQ queues.
I don’t know why, maybe they are confused by the “complexity” of this scenario, but unit tests for this should test only the units you implemented.
Everything that comes from the framework can be mocked at this stage. You are writing tests for your unit of code!
To keep it short here it is for the sender:
package io.gaddings.messaging.demomessaging;


import static org.assertj.core.api.Assertions.assertThatCode;
import static org.mockito.ArgumentMatchers.endsWith;
import static org.mockito.ArgumentMatchers.eq;

import org.junit.Before;
import org.junit.Test;
import org.mockito.Mockito;
import org.springframework.amqp.rabbit.core.RabbitTemplate;

public class MessageSenderTest {

  private MessageSender subject;
  private RabbitTemplate rabbitTemplateMock;

  @Before
  public void setUp() {
    this.rabbitTemplateMock = Mockito.mock(RabbitTemplate.class);
    this.subject = new MessageSender(this.rabbitTemplateMock);
  }

  @Test
  public void testBroadcast() {
    assertThatCode(() -> this.subject.broadcast("Test")).doesNotThrowAnyException();

    Mockito.verify(this.rabbitTemplateMock)
        .convertAndSend(eq(MessagingConfig.FANOUT_EXCHANGE_NAME), eq(""), eq("Test"));
  }

  @Test
  public void testSendError() {
    assertThatCode(() -> this.subject.sendError("Test Error")).doesNotThrowAnyException();

    Mockito.verify(this.rabbitTemplateMock)
        .convertAndSend(eq(MessagingConfig.TOPIC_EXCHANGE_NAME), endsWith("error"),
            eq("Test Error"));
  }

}
Simple enough, right? Tests exactly your unit of code and nothing more.
The receiver is even more simple… (I take the freedom to skip that now)
Remember: You don’t need to write unit tests for (parts of) the spring-boot-amqp framework.
It’s well tested. The spring guys have plenty of tests.
Just wanted to clarify that before we come to the real thing, because I have seen it a lot that people start writing unit tests that use modified spring contexts etc. just because messaging is involved…
Integration tests
For running an integration test you need to set up a real spring context, since you want to test your configuration here. And of course you need a real broker between sender and receiver to be able to verify it works as intended. No mocking here, sorry. And it needs to run in your CI toolchain too.
The bad news is: RabbitMQ has nothing like an embedded version that could be used for testing purposes.
There are a lot of tutorials and stackoverflow posts out there that recommend using apache-qpid broker as the embedded test instance, since it’s compatible with RabbitMQ.
I don’t like that, because you bind yourself to another implementation that you don’t need in production, only to improve the testability of your application.
And: They claim it is compatible. That’s OK. Until it isn’t.
Imagine some day all your tests fail, because of an incompatibility or a bug in the apache-qpid implementation… You could search for hours, maybe days, fixing a problem that can never happen in production.
No, in my opinion we should have the test environment as close as possible to the production environment.
So use an actual RabbitMQ installation for it!
But how? Enter Testcontainers.
Testcontainers is a Java library that supports JUnit tests, providing lightweight, throwaway instances of common databases, Selenium web browsers, or anything else that can run in a Docker container.
Source: The testcontainers homepage
And of course it has a RabbitMQ module.
Just add:
<dependency>
	<groupId>org.testcontainers</groupId>
	<artifactId>testcontainers</artifactId>
	<version>1.12.1</version>
	<scope>test</scope>
</dependency>
to your pom.xml.
Then you can set up your integration tests like that:
package io.gaddings.messaging.demomessaging;
import static org.awaitility.Awaitility.await;
import static org.hamcrest.CoreMatchers.is;
import java.util.concurrent.Callable;
import java.util.concurrent.TimeUnit;
import lombok.val;
import org.junit.ClassRule;
import org.junit.Rule;
import org.junit.Test;
import org.junit.runner.RunWith;
import org.springframework.beans.factory.annotation.Autowired;
import org.springframework.boot.test.context.SpringBootTest;
import org.springframework.boot.test.rule.OutputCapture;
import org.springframework.boot.test.util.TestPropertyValues;
import org.springframework.context.ApplicationContextInitializer;
import org.springframework.context.ConfigurableApplicationContext;
import org.springframework.test.context.ContextConfiguration;
import org.springframework.test.context.junit4.SpringRunner;
import org.testcontainers.containers.GenericContainer;
@RunWith(SpringRunner.class)
@SpringBootTest
@ContextConfiguration(initializers = MessagingApplicationIT.Initializer.class)
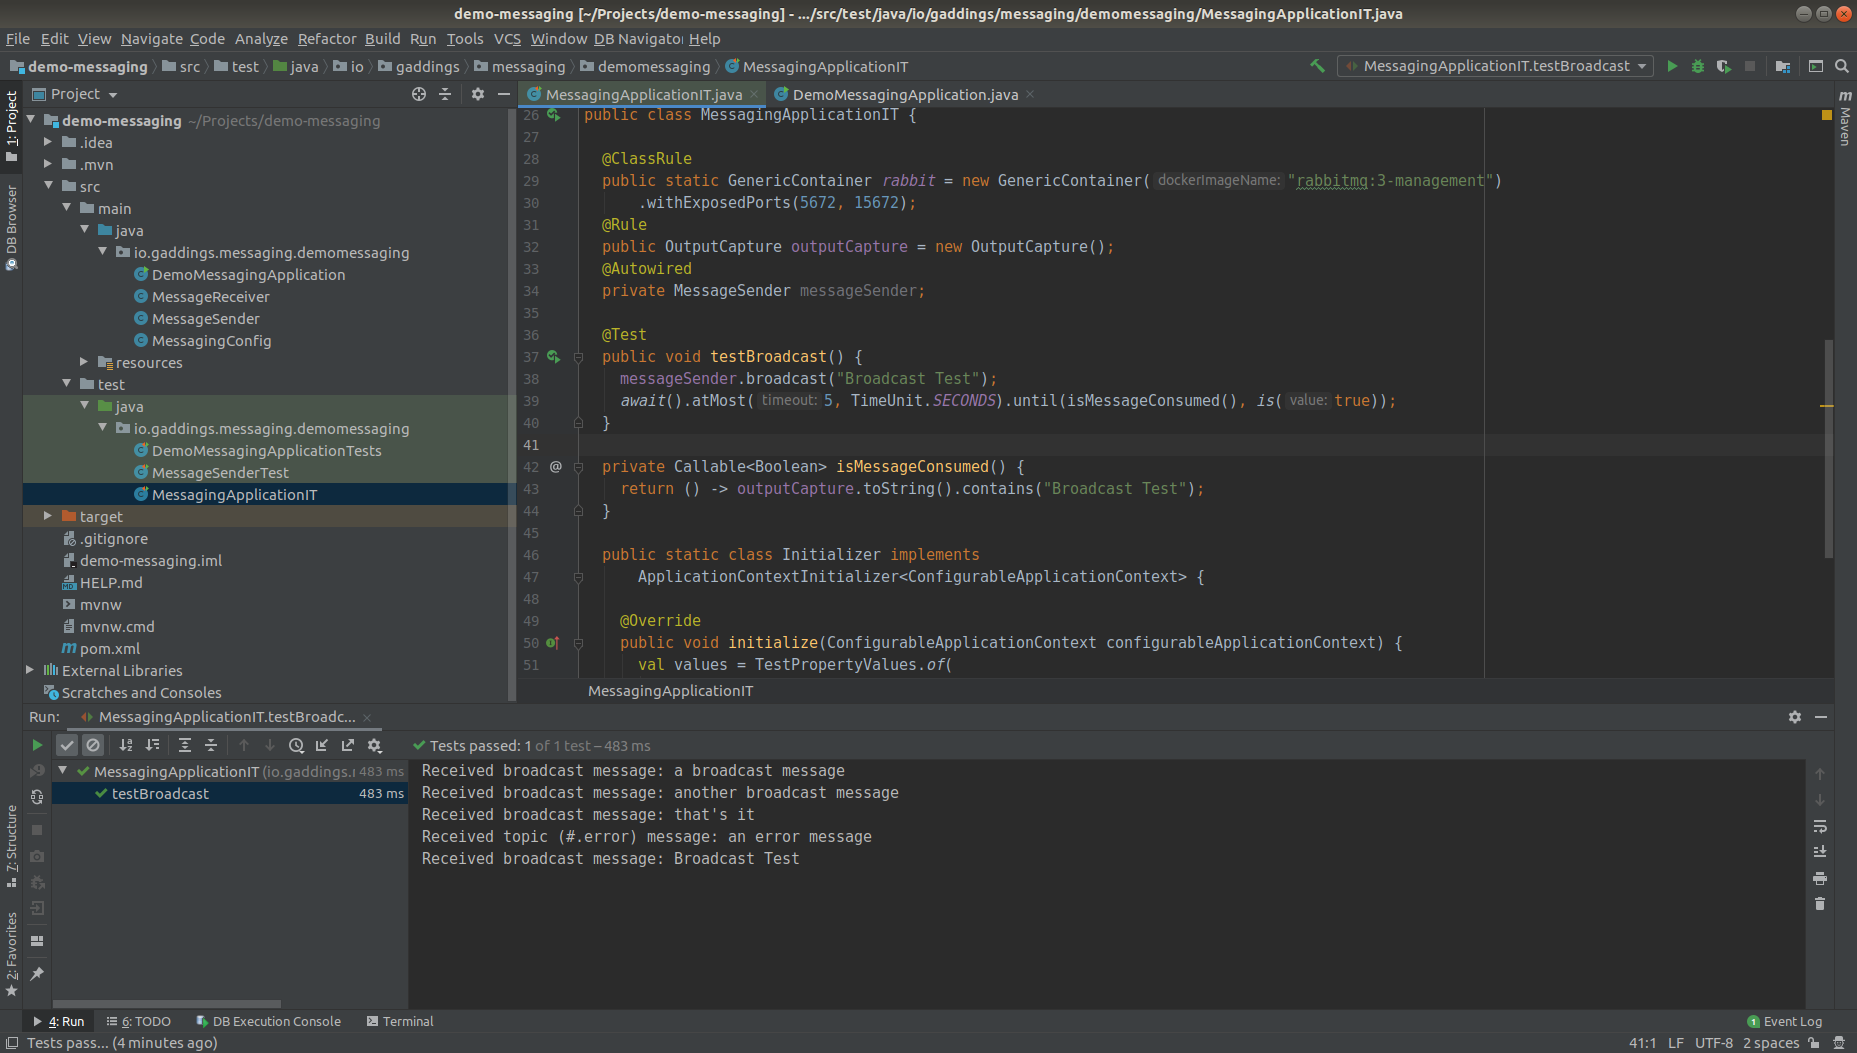
public class MessagingApplicationIT {
@ClassRule
public static GenericContainer rabbit = new GenericContainer("rabbitmq:3-management")
.withExposedPorts(5672, 15672);
@Rule
public OutputCapture outputCapture = new OutputCapture();
@Autowired
private MessageSender messageSender;
@Test
public void testBroadcast() {
messageSender.broadcast("Broadcast Test");
await().atMost(5, TimeUnit.SECONDS).until(isMessageConsumed(), is(true));
}
private Callable<Boolean> isMessageConsumed() {
return () -> outputCapture.toString().contains("Broadcast Test");
}
public static class Initializer implements
ApplicationContextInitializer<ConfigurableApplicationContext> {
@Override
public void initialize(ConfigurableApplicationContext configurableApplicationContext) {
val values = TestPropertyValues.of(
"spring.rabbitmq.host=" + rabbit.getContainerIpAddress(),
"spring.rabbitmq.port=" + rabbit.getMappedPort(5672)
);
values.applyTo(configurableApplicationContext);
}
}
}
With the ClassRule here you’ll set up a RabbitMQ testcontainer for the test.
And you need an initializer to tell ApplicationContext where to find the rabbit.
That’s it.
But before you run it, please stop your other local docker container using:
docker stop my-rabbit
Then run it.
(A lot of stuff will happen in the console when you first run it and it might take a while)
Isn’t this just pure elegance? Setting up your infrastructure as needed by using an on-demand docker container.
What if I can’t use docker in my CI pipeline?
Short answer: Try to change that.
Long answer: If you really can’t I would advise to have a real RabbitMQ instance on the Jenkins (or whatever you use) machine. You can use non-permanent exchanges/queues in your tests and restart the RabbitMQ from your Jenkins pipeline after the tests have been run (if necessary).
Not ideal, but still better than using apache-qpid. (I have nothing against qpid, but I don’t want to see it as a “test-replacement” for RabbitMQ).
Conclusion
In this tutorial I showed you how to write integration tests for spring boot applications using AMQP with RabbitMQ using testcontainers.
In my opinion a great way to simplify things.
Other opinions, remarks or ideas? Feel free to discuss in the comments section!

I think its more complementary to other approaches like qpid or a mock context (e.g. rabbitmq-mock)
Intended usage for them is to test non messaging components (like one uses a mock webcontext)
That was the impression from some short tests last weekend.
Hi Jochen,
I understand the idea to use a mock context like rabbitmq-mock library.
It can of course be useful if you want to have tests that use the full context without the messaging layer. Similar to a MockMvc tests for testing only the web layer. Sure.
But I don’t see why you would use qpid?
As described in the article above this is for unit and integration testing. Of course you need a full (production like) RabbitMQ instance for system tests or consumer-driven contract tests.
Btw. I had to move your comment since it was under the wrong blog post 😉
Hey Marc. Do you have a github repository of this example?
Hi Alex, no sadly not. I have all my code in my private Bitbucket. But it’s all in the article. It’s not much to copy&paste 😉
I love this approach! I also love Testcontainers in general!
Thank you so much for this article that helped me a lot. In return, I make the code available in the git hub:
https://github.com/antonyemanuel/rabbitmqtestcontainer
Hi Antonio, that’s very kind of you!
Now that I have a github account too I could migrate it from my private bitbucket, but I think the dependencies are outdated now…
So thanks again for making it public available!
Hi Marc, very glad to saw your knowledgable article. But when I establish all your code locally, found the integration test can not run while Unit test runs perfectly. Could you share all your example code in GIt or send to my email?
Or if you can leave your email to me, it’s very hard to past some error screenshot here.
Hope your reply, thanks & regards
Hi, and thanks for the comment! I don’t see the issue with Antonio’s code. It should work when executed from within the IDE.
From the command line I’d guess some configuration in the pom.xml is missing (like surefire or failsafe) for executing “*IT” tests.
Nevertheless I checked it out again and updated the testcontainers test to JUnit 5, made some other minor improvements and pushed it to my public github:
https://github.com/gaddingsio/rabbitmqtestcontainers
You can check this if you want and if you still have issues feel free to write here again.
And I have paste the screenshot at Antonio’s git hub as a issue:
https://github.com/antonyemanuel/rabbitmqtestcontainer/issues/1
raise a issue in your git, if you got time, plz help to give some hint. thanks